A wood accent wall can turn a ho-hum living room into a space with real personality. It adds warmth, texture, and a focal point without the commitment of wallpapering or painting every surface. Whether the homeowner is after a rustic reclaimed look or a clean, modern shiplap vibe, the right wood wall delivers impact. The project sits somewhere between cosmetic and intermediate DIY, accessible for most handy folks, but demanding enough that prep work and attention to detail separate a good result from a rough one. This guide walks through the why, what, and how of building a wood accent wall that holds up and looks sharp.
Table of Contents
ToggleKey Takeaways
- A wood accent wall adds dimension, warmth, and texture to your living room while forgiving minor drywall imperfections, making it ideal for defining zones in open floor plans.
- Choose between reclaimed wood ($4–$12 per sq. ft.), shiplap ($1.50–$3 per board foot), or tongue-and-groove planks based on your design aesthetic and DIY comfort level.
- Proper wood accent wall installation requires acclimating wood 48–72 hours, locating studs, using construction adhesive, and securing planks with brad nails every 16 inches into studs.
- Horizontal planks visually widen rooms while vertical boards add height; horizontal layouts are best for high ceilings, and diagonal patterns require advanced trim carpentry skills.
- Enhance your wood accent wall with strategic lighting (wall sconces, picture lights), minimal wall art, and paired textiles like leather and linen to let the texture shine without overwhelming the space.
- Maintain your wood accent wall by dusting regularly with a microfiber cloth and spot-cleaning with damp cloths to preserve its finish and prevent premature wear.
Why Choose a Wood Accent Wall for Your Living Room?
Wood brings something paint and wallpaper can’t: dimension. The material’s natural grain, color variation, and shadow lines create visual interest that changes with the light throughout the day. It’s particularly effective in living rooms with open floor plans, where defining zones without walls becomes important.
From a practical standpoint, wood accent walls are forgiving. Minor drywall imperfections disappear beneath planks, and damaged sections can be replaced individually, unlike paint or wallpaper that requires matching and blending. The installation itself is manageable for anyone comfortable with a miter saw, level, and drill.
Wood also plays well with multiple design styles. Horizontal planks read modern farmhouse: vertical boards with a darker stain lean mid-century. Wide-plank reclaimed lumber brings industrial warmth, while tongue-and-groove pine keeps things coastal. The material adapts.
There’s a thermal benefit, too. Wood provides a modest layer of insulation and dampens sound better than bare drywall, helpful in rooms with hard flooring and minimal soft furnishings. It won’t replace actual insulation, but it takes the edge off echo and makes a room feel cozier.
Best Wood Types and Materials for Living Room Accent Walls
Choosing the right material sets the tone and determines how much prep, finishing, and long-term maintenance the project requires. Not all wood is created equal for interior vertical applications.
Reclaimed Wood and Pallet Boards
Reclaimed wood delivers character that new lumber can’t match, weathered patina, nail holes, saw marks, and color variation that comes from decades of exposure. Barn siding, old fence boards, and factory floor planks are popular sources. Reclaimed material typically ranges from ¾” to 1″ thick and comes in random widths, which adds to the organic look.
The trade-off: reclaimed wood requires more prep. It needs cleaning, denailing, planing (if warped), and often pest treatment. Moisture content should be checked with a moisture meter: aim for 6–9% for interior use to prevent future warping. Expect to pay $4–$12 per square foot depending on species and source, and budget time for sorting and sizing.
Pallet boards are the budget-friendly cousin, often free from warehouses or big-box stores. They’re usually 3.5″ wide and made from oak, pine, or mixed hardwoods. The downside: pallets are inconsistent in quality, and some are treated with chemicals (look for the HT stamp, indicating heat-treated, not chemically treated). They require extensive disassembly, denailing, sanding, and finishing. For a living room, pallet wood works best as an accent within an accent wall, mixed with cleaner boards, or when the goal is ultra-rustic.
Shiplap and Tongue-and-Groove Planks
Shiplap has a rabbet (notch) cut along the edges that allows boards to overlap slightly, creating a tight, flush surface with subtle shadow lines. It’s typically ¾” × 5.5″ nominal (actual dimensions closer to 11/16″ × 5¼”). Pine shiplap is the most affordable at $1.50–$3 per board foot: cedar and hardwoods run higher.
Shiplap installs quickly and works for both horizontal and vertical layouts. It’s the go-to for clean, modern farmhouse aesthetics popularized by design-forward interiors. The boards come pre-milled and require minimal finishing if purchasing pre-primed or pre-stained options.
Tongue-and-groove (T&G) planks have a protruding tongue on one edge and a groove on the other, locking together for a seamless look with no visible gaps. Standard dimensions are ¾” × 3.5″ or ¾” × 5.5″. T&G is ideal for ceilings and walls where a smooth, continuous surface is desired. Pine, cedar, and knotty alder are common species.
Both shiplap and T&G can be installed directly over drywall using a nail gun and construction adhesive, provided studs are located and marked. They’re beginner-friendly and produce consistent results without the sorting headaches of reclaimed material.
Choosing the Perfect Wall and Design Layout
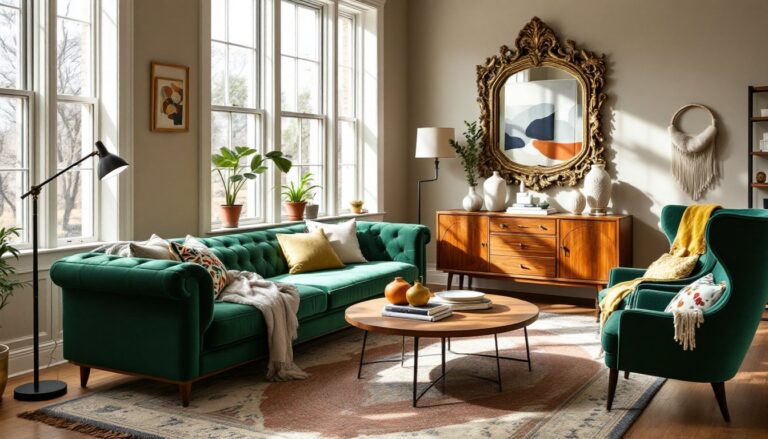
Not every wall is the right candidate. The ideal accent wall draws the eye without competing with windows, doors, or existing architectural features. In most living rooms, the wall behind the sofa or the one facing the entryway works best, it’s the first thing visitors see and frames the seating area.
Avoid walls with complicated outlets, HVAC vents, or built-in shelving unless comfortable working around them. Cutting notches for outlets is straightforward with a jigsaw, but a wall crowded with obstacles slows progress and increases waste.
Layout orientation changes the room’s proportions. Horizontal planks make a room feel wider and lower, good for rooms with high ceilings or narrow dimensions. Vertical planks add height and formality, useful in spaces with standard 8′ ceilings. Diagonal or herringbone patterns create dynamic movement but require precise miter cuts and more material due to waste. Reserve intricate patterns for smaller accent areas unless experienced with trim carpentry.
Before buying material, measure the wall’s square footage (height × width) and add 10–15% for waste, more if using reclaimed wood with variable lengths. Sketch the layout on graph paper or use painter’s tape on the wall to visualize plank spacing and orientation. Planning reveals how many full planks fit and where seams fall, critical for a balanced look.
Consider the room’s existing color palette and design scheme when selecting wood tone and finish. A dark walnut stain anchors a light, airy room: natural pine or whitewashed boards brighten a space with darker furniture.
Step-by-Step Installation Guide for Your Wood Accent Wall
Proper installation separates a pro-looking accent wall from one that sags or gaps over time. This process assumes a standard drywall-over-stud wall: if working with plaster, brick, or concrete, furring strips may be required.
Materials and Tools Needed:
- Wood planks (measured and purchased with waste allowance)
- Stud finder and level (4′ level minimum)
- Miter saw or circular saw with fine-tooth blade
- 18-gauge brad nailer or finish nailer with compressor
- Construction adhesive (like Liquid Nails or PL Premium)
- Tape measure, pencil, safety glasses, hearing protection
- Spacers (nickels or 1/16″ shims for consistent gaps, if desired)
- Sandpaper (120- and 220-grit) and finishing supplies (stain, poly, or paint)
Step 1: Prep the Wall
Remove outlet covers, switch plates, and any wall-mounted fixtures. Patch holes or dents with spackle if the drywall is in rough shape, though small imperfections won’t show. Use the stud finder to locate and mark studs with painter’s tape or light pencil lines, nailing into studs (not just drywall) is critical for secure attachment.
Step 2: Acclimate and Finish the Wood
Let wood sit in the room for 48–72 hours to acclimate to the home’s humidity. This prevents expansion or contraction after installation. Sand boards to at least 120-grit smoothness. Apply stain, paint, or sealer before installation, it’s far easier to finish boards flat on sawhorses than on the wall. Two coats of water-based polyurethane or a penetrating sealer (like tung oil) protect against moisture and make cleaning easier.
Step 3: Install the First Plank
Start at the ceiling or floor, depending on layout. For horizontal installations, starting at the ceiling and working down often hides small gaps near the baseboard. Run a level line and use it as your guide. Apply a bead of construction adhesive to the back of the first plank in a zigzag pattern. Press it to the wall along the level line, then secure with 18-gauge brad nails every 16″ along studs. Nails should penetrate studs by at least 1″. If using T&G, nail through the tongue at a slight angle so the next board’s groove hides the nail head.
Step 4: Continue Row by Row
Work your way across or down the wall, checking level every few rows. For shiplap or boards with spacing, use consistent shims or spacers between planks, 1/16″ is typical and creates clean shadow lines. Stagger seams if boards aren’t full wall length: avoid aligning seams in adjacent rows, which looks amateurish. Many experienced DIYers recommend dry-fitting several rows before nailing to ensure spacing and seam placement look intentional.
Step 5: Cut Around Obstacles
Measure and mark cutouts for outlets and switches. A jigsaw handles these quickly. Cut slightly oversized (about 1/16″ extra) so the cover plate hides gaps. For light switches, the box may need an extender ring to bring it flush with the new wall surface, available at hardware stores for under $2.
Step 6: Final Row and Trim
The last row often requires ripping boards to width. A table saw or circular saw with a guide gives the cleanest cuts. If ending at the floor and the gap is uneven, scribe the board to match the floor profile using a compass, then cut along the line. Reinstall baseboards or add quarter-round trim to cover the bottom edge. Caulk any gaps where wood meets ceiling, corners, or trim with paintable caulk, then touch up the caulk line with finish if needed.
Safety note: Always wear safety glasses when cutting and hearing protection when using power nailers or saws. Work in a ventilated area if applying solvent-based finishes.
Styling Tips: Making Your Wood Accent Wall Stand Out
The wall is installed, now it’s time to make it the star without overpowering the room. Thoughtful styling amplifies the wood’s impact and ties it into the overall design.
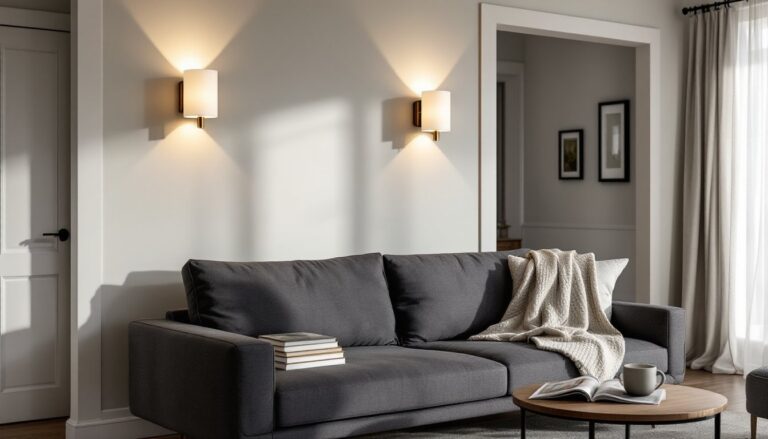
Lighting is crucial. Wood texture comes alive with the right illumination. Wall sconces flanking the accent wall cast shadows that highlight grain and plank lines. Picture lights or track lighting angled to graze the surface create drama. Avoid flat, overhead-only lighting, which flattens the dimensional effect. If the wall is behind a TV or media console, LED strip lighting behind furniture adds a floating effect and washes the wood with subtle glow.
Furniture placement should respect the focal point. Position the sofa or main seating facing the accent wall, or place the wall behind the sofa as a backdrop. Keep large furniture pieces a few inches away from the wall to prevent scuffs and allow the wood to breathe visually. Low-profile media consoles, open shelving, or a single statement piece (like a live-edge bench) work better than bulky entertainment centers that hide the wall.
Wall art and décor require restraint. Wood is textured and busy on its own. One large canvas or a small gallery grouping is enough, avoid cluttering the wall with dozens of small frames. Floating shelves with minimal styling (a few books, a plant, a sculptural object) add dimension without chaos. Metal or matte black frames contrast nicely with natural wood tones.
Consider the room’s overall aesthetic when pairing textiles and finishes. Leather, linen, and wool complement wood’s organic feel. In modern spaces, pair clean-lined wood with glass, metal, and monochromatic palettes. In transitional or farmhouse rooms, layer in soft neutrals, greenery, and vintage accents.
Color coordination matters, too. If the wood is dark or heavily stained, balance it with lighter furniture and paint colors on adjacent walls to prevent the room from feeling cave-like. Light or whitewashed wood pairs well with bold accent colors and darker furnishings. The wood should anchor the space, not dominate it.
Plants bring life to wood walls, literally. The contrast between living greenery and textured timber is visually satisfying. Hanging planters, wall-mounted pots, or a tall fiddle-leaf fig in the corner soften the hard lines and add a biophilic design element that’s trending in 2026, as noted by design authorities covering contemporary interiors.
Finally, maintain the wall. Dust regularly with a microfiber cloth or vacuum with a brush attachment. For sealed or finished wood, a damp cloth works for spot cleaning. Avoid harsh chemicals that strip finish or discolor wood over time. A well-maintained wood accent wall ages gracefully and develops character rather than looking worn.
A wood accent wall isn’t a quick weekend flip, but it’s one of those projects that pays dividends every time someone walks into the room. It’s texture, warmth, and craftsmanship on display, a reminder that the best spaces are built, not just decorated.